Sunday, February 27, 2011

Blog Candy Winner

Winner of the Motions & Folds Card Hop

#49  Lisa said...Those are some really cute cards!  
I am a new follower.  TFS  
Her blog is:  http://lisaspaperbutterflies.blogspot.com/

 
Lisa has won the Interactive Cards book by 
Tanya Fox 
 
Now she can practice all the fun techniques 
we saw during the card hop! 
 
Congratulations Lisa I will be contacting you!


A  Special Welcome to all New Followers!
Have a Blessed Day!


Saturday, February 26, 2011

Welcome to the Hop Today


If you arrived here from our talented host, 
 then you are headed in the right direction. 

If you just happened here, please begin with Ellen above!

"I Love You"  Waterfall Card


 When you pull the tab the message rotates!

 Inside area for sentiment
Card Size:  4 1/4" x 5 1/2"


Here's How to Make It:  

Scalloped ovals 2 1/4", Storybook
Card stock strip 2 1/4" x 8 3/4"
Score at 1 3/4", 2 1/2", 3 1/4" and 4"
from one end and crease well


     Place adhesive on small area of scallops...not too far.


Begin placing scallops from a score line down.  Each section will get a scallop.

After all glued down.  Cut ovals 1 3/4" add to scallops, punch hole for ribbon
and decorate!

Cut 3/4" x 4 1/4" band. Place adhesive on each end only.  Place on card
1" up from bottom.  Slide strip with ovals under band. Flip over and lay down last 
scallop even with band and adhere to band to make it stationery. 
This is a simple card technique that's loads of fun!

Square Waterfall Card


Same technique as above, but this time I 
wanted to make a larger card.  
I will use this to teach children with the colors of the salvation story 
as the colors fall back in the card.


Card Size:  5" x 7"
Card stock strip:  2" x 12 1/2"
(I pieced the strip)
Score at 2", 2 3/4", 3 1/2", 4 1/4", 5" and 6"
Colored squares:  2"


Blog Candy Time!!!!!!

You have been so patient reading this long post.
Thank you for visiting!

How to Win:

Become a Follower if not already
Leave a comment on this post!
I will use random.org 


You will win this Interactive Cards book
to practice all the fun cards you will see
during the Card Hop today!

Next Stop on the Hop:

Motions & Folds Card Hop List
Selina at:  http://www.mudpiereality.blogspot.com/     **You Are Here
Sarah at:  http://www.simplyshaddock.blogspot.com/   ***NEXT STOP


Friday, February 25, 2011

Never Ending Card

A Fun Card that Keeps Folding and Folding


Front of Card


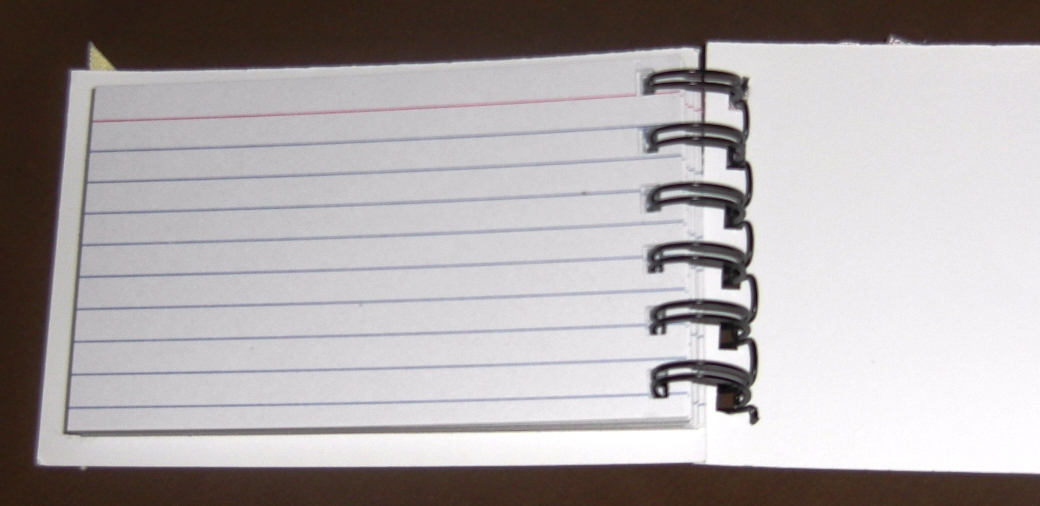
Flipped Open to First Page 
I just added some journaling spots quickly, but of course
this can be decorated anyway you want with lot's 
of space to get creative with!


 Unfolded Again to Second Page


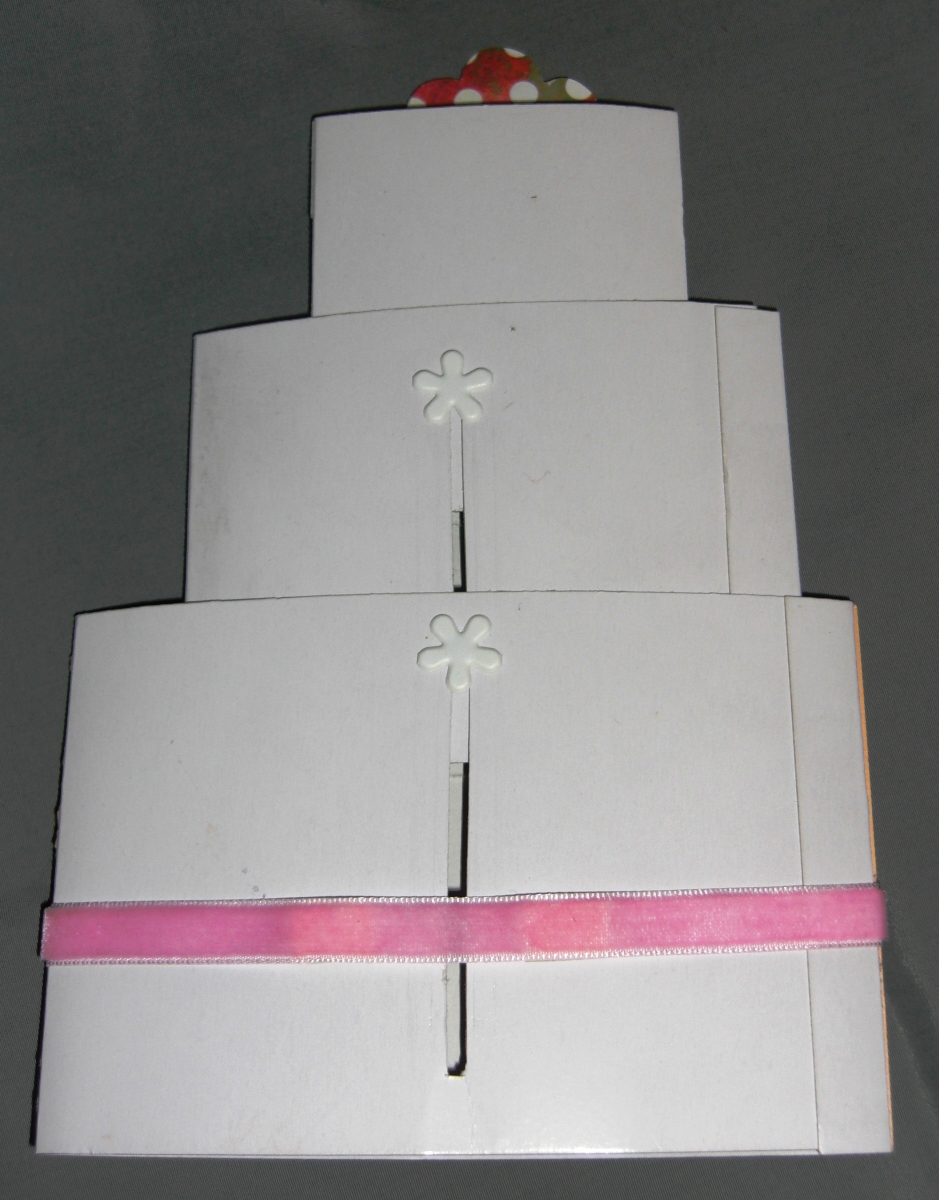
Back Again to Back of Card

If you haven't ever tried this...it's really simple!
Here's How You Make a Never Ending Card


Step 1 - Cut 4  3" x 6" pieces of paper/card stock
2 pieces of 2 different patterns
I used double sided paper


Step 2 - Score at 1 1/2" from each short edge on all pieces
Measure carefully to keep all the same.  If using paper, score two at a time.


Step 3 - Crease well on score lines.


Step 4 -  Lay two pieces down horizontally.
Place adhesive on back side in upper and lower corners 
not going too far down.  Line up score lines.


Step 5 - Place other two pieces of paper/cd stock on top vertically
lining up carefully at the edges.


Step 6 - Unfold pushing sides to the back making sure they line up at the back
and crease on front to make 1st page.


Step 7 - Unfold again pushing sides to the back, make sure back lines up
to meet in middle and crease the front.


Step 8 - Push toward back one last time and you will be
at the back side as you see below.


Now it's time to decorate your panels!
You can cut an image in half and adhere to both sides to meet 
in the middle of the panels at the front or back.


Never Ending Salvation Card
I'm sure you've seen the salvation bracelets with colors to tell about faith.
Well, I wanted to try a never ending card with the colors.
I plan to use this with children and it may make a great VBS project also!


Black - Sin/wrong we've done            White - If we ask for forgiveness
Red - Jesus' blood- died on cross         We will be washed whiter than snow


Blue - Baptism is the first thing we do      Green - Growth as a Christian
in obedience to God showing others        Yellow - Heaven when we die
the decision we've made


Have fun creating a Never Ending Card!
It's a little touch of whimsy to brighten someone's day!

Wednesday, February 23, 2011

Three Tier Birthday Card

Birthday Cake Anyone?


A small pretty package with surprises!

When you pull up on the flower here's what you see....


This style of card is so fun and whimsical.  
I learned how to make this from the Interactive Cards book, Tanya Fox

Dimensions & Instructions:
Use plain cardstock for:
Bottom Tier:  11 x 3 1/2"  Score at 1/2" and 5 3/4" from left side
Middle Tier:  8 5/8 x 3 1/8" Score at 1/2" and 4 5/8" from left side
Top Tier:  5 3/4 x 3 " Score at 1/2" and 3 1/8" from left side

Cut patterned/solid paper for cake layers
Bottom Tier:  5 1/4 x 3 1/2"
Middle Tier:  4 1/2 x 3 1/8"
Top Tier:  2 5/8 x 3"


Make notches in center of each tier so flower will show (can use punch)
On back of tiers make slit for sliding motion
Middle Tier center of right hand panel
begin at 3/4" from top:  1 1/2" long slit 1/16" wide
Bottom Tier Right Hand Side of Panel:  begin 1/2" from top:  2 3/4"long slit
No slits on top tier

Fold top tier on scored lines, place in middle tier centered and line up the slit.  
Make a mark on the top tier through the slit at the bottom.  
Remove top tier and punch small hole at the mark you made.  
Insert large brad in slit and hole to attach together.  Adhere top tier ends together.

Punch hole in back of middle tier 1/2" below bottom of slit and attach bottom tier 
to middle tier with brad through slit.  Adhere ends of middle and bottom tiers.  
Add flower on top for the pull and decoration for the layers.  
Repunch or cut the notch if needed.  
I added foam tape to back ribbon so it would not interfere with the sliding.

Thanks for coming by! 
Don't forget to come back for 
Motions & Cards Blog Hop Saturday, Feb. 26

I'll have BLOG CANDY!


Tuesday, February 22, 2011

Desk Card

Live, Laugh, Love...


Instead of making a stair step card lying down, 
I wanted to make one vertical to sit on a desk.

Size:  6" x 9"  Scored at 2 1/4", 4 1/2" and 6 3/4"

The argyle strips have been weaved through slots
that was made by folding in half at 4 1/2" score line and 
cutting lines from fold to next score line at 1 1/2", 3" and 4 1/2" down the panel.

I believe one of the secrets to life is learning to live, 
find laughter and something to smile about, no matter what is going on 
and experiencing one of the greatest gifts to give and receive...to love. 

It's my prayer that we will find these treasures in each and every day!

After all, we have to go through life anyway, we might as well
choose how we look at things!  It makes all the difference!

Thursday, February 17, 2011

Small Blessings

Since we all hear the negative and fussy things all the time, 
I wanted to share something encouraging that happened to me today!  

As I mentioned earlier my Cricut Expression had to be sent to Provo Craft 
for replacement because of a bad LCD screen, thankfully, 
I just squeezed in under the warranty with about 10 days to spare.  

Their customer service was great!

About 2 weeks later as promised, Provo Craft sent me a refurbished machine.  
To my great surprise there were small blessings inside the box also.  
A new cutting mat and 2 new cartridges:  Plantin SchoolBook and Accent Essentials.  

Another blessing was that I did not have either of these cartridges.  
My Cricut Expression bundle came with entirely different cartridges.

Yeah!  I'm thanking God for small blessings!  
I'm sure Provo Craft gets lot's of negative feedback, 
but this is one customer who is very happy! 

So, there's some positive small blessings to brighten your day!!!!

Tuesday, February 15, 2011

God Didn't Send a Card, He Sent a Cross!

While thinking of Valentines Day this past week and 
wondering what saying we could put on our Church sign 
to motivate others during the week, 
my 12 yr. old Son said well, you could say,

"God didn't send a card...He sent a cross!"

 My husband and I just looked at each other and said, "Yes", that's exactly what we 
will put on there.  When we think of how we tell others we love them, may we 
be reminded just like I was this week, that God didn't send us a little greeting 
and leave us alone in our wrong/sin.

He loved us so much that He sent us ALL...His Son.  
Jesus came, lived a perfect life and became the payment for all our wrong/sin 
and died on the cross, so we could ask God for forgiveness and 
accept the gift of salvation through Jesus' death.  

It's a beautiful picture of love that will never be replaced with all the cards, flowers, 
chocolate and gifts we give on Valentines Day or any other holiday.  

It's Priceless!

"For God so loved the world, that he gave his only begotten Son, 
that whosoever believeth in him should not perish, 
but have everlasting life."  John 3:16

Saturday, February 12, 2011

Using Vintage Postcards

One of my favorite sayings about my paper crafting hobby is
"I just like to play with paper and glue."

Well, since I've discovered vintage postcards I can say,
"I like to play with paper, vintage and glue!"


I needed a special thank you card for someone
with a timeless personality and decided to use this
Loving Wishes postcard, which was postmarked 1911.

 
It is one of the earliest postcards being printed in Germany.
After World War I the postcards were no longer printed there 
and the U.S. began printing their own.

Look around this week and find someone in your life
you can say thank you to.  I thank God for the 
special people he as placed in my life.

Thank you for visiting and following my blog!
Have a wonderful weekend!


Thursday, February 10, 2011

Blog Hop Coming Soon


Have you seen elaborate cards and thought..." I wonder how they did that?"
There will be super talented ladies sharing ideas beginning with
Ellen at Card Monkey  http://cardmonkey-business.blogspot.com 

She is hosting a card hop with each stop
showing a card or layout with unique folds or motions!

Mud Pie Reality is blessed to be a stop for this card hop!
I'm working on ideas and looking forward to this opportunity
to meet so many lovely crafters and of course...

There will be BLOG CANDY!  Mark Your Calendars!!!!

Tuesday, February 8, 2011

Small Notebook with Bind-it-All

With my Cricut expression being sick and at Provo Craft
I am using other tools of the trade today!

Scrapbooking friends introduced me to the Bind-it-All machine.
I was making lots of gift books and this proved to be a wonderful 
and economical way to make the gift books.

Small Notebook


Size:  3 1/2" x 5 1/2"
Front & Back Cover is Die Cuts with a View Card Stock

(I used to use chipboard and cover with paper, but found
it was much easier to use card stock and it looked just as good)


While you can cut paper for the inside, I use
3"x 5" index cards and it's quick to put together.


You can choose to use the blank side or the ruled line side.

The 1/2" O wire was used to bind the notebook.
Card stock and index cards were lined up in the 
center of machine to punch holes.

Hope you enjoy making gifts for those you love!  Have a blessed day!  

I also want to say Happy Birthday to my Dad today!  I love you Dad!